Wednesday, 3 March 2010

Sound Effects


I contributed a lot to the sound effects within our environment. Indeed, without sound I believe our environment would have been very dull despite the nice visuals. The sound effects certainly added a new dimension to the environment and introduced far more weight to each shot. The sound effects not only created an interesting atmosphere to surround the environment but also injected life into each shot.

I used sound effects to suggest things happening out of frame and thus enhance the visual experience. I attempted to use sound to make the environment seem larger, believable and realistic as possible. I wanted the sound to suggest animation both seen and unseen. For example I wanted tank track sound effects to be heard despite the fact that in some scenes the dump truck's wheels were not animated. I wanted the sounds to inform the viewer of how large the scale was of our environment. The wind sound effects worked extraordinarily well with the dust layers and certainly improved the exterior shots. I focused on using sound effects that would fit in the environment. I wanted the viewer to think that the sounds they were hearing belonged to the objects that were making them.

To me sound is 75% of the experience and I wanted it just right. Sound edited effectively can do wonders and enhance the visuals ten fold. I know we are not being graded on sound however not putting sound on to the final edit would have been a disappointment and would not have done the environment any favors. The sound files were perhaps the most expensive thing out of the whole project. All the sounds roughly cost about $30.

Adobe After Effects & Compositing

Here are some shots I managed to finish today in After Effects.

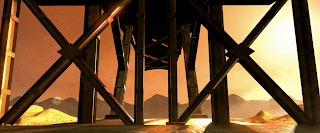
I really like the way this static shot came out. Although it is static, the dust layer really brings this shot to life
This was a tough scene to do as I had to parent and animate the background layer and dust layer to the 3D desert terrain. It looks like a relatively simple shot however there are a lot of layers here. I took a photograph of my Dad's car's dashboard which can be seen at the bottom left of the screen, I believe this provides something familiar to the scene which the viewer can relate to, it also makes the interior less empty and more interesting and realistic. I also took film of a swinging card pass which hangs from the roof of the cockpit of the vehicle. This adds movement and additional animation to make the scene more interesting and to inject a little life to an otherwise dull scene. I also filmed a movie of my Dad to create the driver's reflection. This too helps to bring life to the film. The cockpit windscreen is a basic layer made in photoshop which was animated in adobe after effects to depict the illusion of uneven terrain and to give a sense of the motion of the vehicle. I also added soot near the corners of the panes of glass as extra detail to make the vehicle used and weathered. I was very pleased how the smoke/ dust layer turned out too. It was used throughout the short film, and helps to convey weather and enhance the atmosphere of the environment.

I was concerned that the sky was a little too pink so Tom and I graded it so that the background was more orange thus creating the illusion that the vehicle had orange tinted glass. This was as they say, a happy accident and seems to fit rather nicely. This scene looks quite decent and adds a new dimension to the film, it also seems to humanise the environment too.

Rendering


I was very happy with the render below. It is very close to that of the original shot in the storyboards. The reason why I like it so much is because of the use of lighting which illuminates areas of the communications mast, yet not revealing the poor texture that is applied. In fact, the poor texture is not really visible. This is why lighting can be so important.

Sunday, 21 February 2010

3D Communications Mast Model


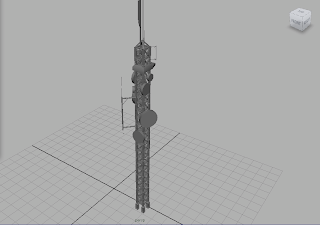
Again I think too much detail was included in this 3D model of a communications mast. However I had a lot of fun building this model. I wanted it to be as realistic as possible. I used this model as a means to improve my modeling skills. To build this model I used various reference material. Although in most scenes this is in the background, I am still very happy the way this model turned out.


The texture below was very simple to create in Photoshop. Again I didn't want to get too worried with the texture detail as the texture will hardly be seen due to lighting and distance.

3D Pipeline Model


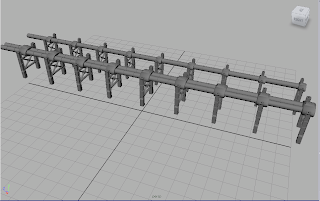
I think I went to town a bit too much with this model. However I did have fun modeling it. I went into a lot of detail using photo reference from numerous sources. I was focusing on improving my modeling skills.


Below is a simple rust texture I created in Photoshop. This texture is what I used to apply to the pipeline model above. Although it is a very simple texture, the whole idea is that the viewer will not see the pipeline close up so therefore the texture does not need to include much detail.

Thursday, 18 February 2010

Textured 3D Mining Vehicle Model

Below is a test render with a directional light. I wanted to make sure that there would be no problems when light interacted with the mesh of the 3D model.
Below are a few images of the mining vehicle near its final stages of texturing. I have to admit that the process of texturing took a lot longer than I had anticipated and was much harder to grasp and understand. I had a lot of difficulty with planar and UV mapping. I was shown how to texture efficiently by both Alex and Andy. The best section of texturing was the vehicle's side texture. The textures to the sides of the mining vehicle came out really well and matched the geometry of the vehicle, however to the rear and top of the vehicle the texturing was a lot to be desired as there were texture stretch marks. However, that said, I do believe that this issue will not matter too much as the shots of this vehicle will mostly be from a low angle or from a distance so the texturing will not be easily seen. Plus half of the vehicle will be shrouded in shadow due to high contrast between light and shadow during the "golden hour"/ sunset.
Texturing this vehicle was a massive learning experience and I leant a lot whilst modeling and texturing this vehicle. For instance I leant the importance of naming different sections of geometry and naming different textures, I also discovered how to use the planar mapping function, I am also beginning to understand the way UV's work.


To make the vehicle seem used and interesting I added a few textures/ decals. Jared suggested that we attempt to indicate that our environment seemed busy and felt "lived in" and inhabited by miners. He suggested that we add character to the environment which would in turn create a more human and industrial atmosphere. The group agreed that we wanted to avoid our environment from becoming dead. We needed to give the environment some life or at least an indication of life. I decided to follow Jared's suggestion by adding these textures/ decals such as pin-up nose art, graffiti and hazard strips. As a group we also decided to dot other examples of posters, signs and graffiti around the environment to have that "lived in" feel.

Monday, 15 February 2010

3D Mining Vehicle Model (Occlusion Render)

These are a few occlusion renders of the 3D Mining Vehicle. I am very pleased with how these renders came out. Indeed the contrast between the light and the shadows emphasise the vehicles form and where surfaces meet. This render option was entirely new to me and this was certainly something new I learnt today, and I am grateful for my brother and Andy for showing me how to execute an occlusion render.